I’m using the Genesis Framework and love how StudioPress.com and Briangardner.com use a well styled newsletter signup box after their blog post. I’ve wanted to do this for awhile, but haven’t been able to sit long enough to walk through all the steps… Until now.
Initially, I used the exact steps Brian outlined on his post How to Add an Email Newsletter Signup Box which included the functions.php code for registering the newsletter widget area, css code, graphics and using the Genesis eNews Extended plugin by Brandon Kraft.
Brian’s post was excellent and literally served up all the code and goodies you need to make the newsletter signup box work using a newsletter widget, but it didn’t work for my Aweber newsletter.
Brandon Kraft’s plugin page had some helpful Aweber instructions, but I found it too brief to actually just understand and run with. For me, I had complications with the Genesis eNews Extended plugin options and hand to reverse engineer some things to make it work. Mileage varies and those two posts may give you exactly what you need.
Anyway, on to the steps for setting up your custom Aweber newsletter form using a Studiopress theme.
There are 5 parts to this tutorial.
- Setting up a custom widget area for your newsletter signup box. (Only works with Genesis Framework).
- Writing your custom function for placing newsletters signup box after the post. (Only works with Genesis Framework)
- Specific Aweber elements and steps within your Aweber Admin area.
- Using Aweber newsletter html for your customer form via basic Text widget. (Works on any WordPress theme)
- Styling your newsletter signup box with css. (Works for any WordPress theme).
Steps 1, 2, and 5 are copied from Brian Gardner’s “How to Add an Email Newsletter Signup Box” blog post (linked above).
1. Register a Widget Area
Copy the code below and put it into your child theme’s functions.php file:
/** Register newsletter widget area */
genesis_register_sidebar( array(
    'id'    => 'newsletter',
    'name'    => __( 'Newsletter', 'custom-theme' ),
    'description'    => __( 'This is the newsletter section.', 'custom-theme' ),
) );
2. Write a Custom Function
Now you need to write a function which hooks the newsletter widget area to the end of the blog post. Copy the code below and put it into your child theme’s functions.php file:
/** Add the newsletter widget after the post content */
add_action( 'genesis_after_post_content', 'custom_add_newsletter_box' );
function custom_add_newsletter_box() {
    if ( is_singular( 'post' ) )
    genesis_widget_area( 'newsletter', array(
        'before' => '<div id="enews widget-area">',
    ) );
}
3. Aweber Specific Elements
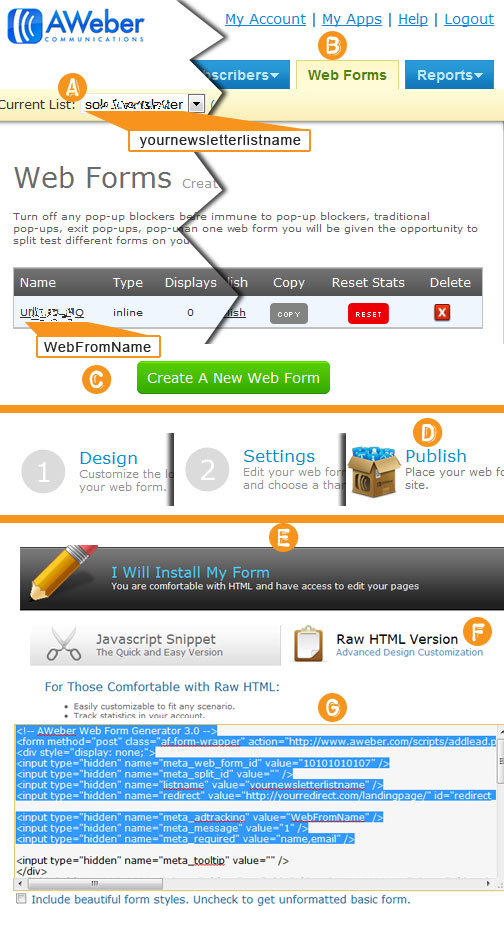
In the graphic below, you’ll see key areas within your Aweber Admin so you have a point of reference.
Select (or Create) your Aweber List – If you don’t have a newsletter list created yet, you’ll need to make one. In the image, my newsletter list (used throughout this tutorial) is “yournewsletterlistname” as indicated by the “(A)” in the graphic.
Select (or Create) your Aweber Web Form – As indicated with the “(B)” and “(C)” areas, you’ll need to have a web form created for your newsletter list. By doing this, you’ll have a unique form ID which corresponds with your web form name. In the image, I’ve called this webform “WebFromName”. If you have to create a web form, all that matters is that your form has an email field since that’s all we require in this tutorial. In the image below, “(G)” shows “10101010107” as the web form ID. TIP: As you build or edit the form, you’ll see the unique form ID in your url and it will look like this: http://www.aweber.com/users/web_forms/edit/10101010107

Areas D – G all happen within the web form tool of Aweber. Once your web form is published “(D)” you select the raw HTML “(F)” and use only a few parts of the provided HTML code shown in “(G)”.
Select your Aweber Web Form Code in Aweber Admin
Here is the chunk of code you want to pull out from Aweber and work with. NOTE, this is not exactly acceptable as is!
[prettify class=”html”]

 I personally prefer a simple footer credits area that doesn’t distract from the site but gives credit with seo text and is visible only if you are looking for it.


