• Skip to primary navigation
  • Skip to main content

JustinMcCullough.com

Growth Catalyst, Leadership Development and Team Builder

  • Speaking
  • Ebooks
  • Testimonials and Endorsements
  • About

How to Add an Aweber Email Newsletter Signup Box Below Your Blog Post

By Justin McCullough

I’m using the Genesis Framework and love how StudioPress.com and Briangardner.com use a well styled newsletter signup box after their blog post. I’ve wanted to do this for awhile, but haven’t been able to sit long enough to walk through all the steps… Until now.

The setup steps for Genesis Framework + Aweber Newsletter are a little further down.

Initially, I used the exact steps Brian outlined on his post How to Add an Email Newsletter Signup Box which included the functions.php code for registering the newsletter widget area, css code, graphics and using the Genesis eNews Extended plugin by Brandon Kraft.

Brian’s post was excellent and literally served up all the code and goodies you need to make the newsletter signup box work using a newsletter widget, but it didn’t work for my Aweber newsletter.

Brandon Kraft’s plugin page had some helpful Aweber instructions, but I found it too brief to actually just understand and run with.  For me,  I had complications with the Genesis eNews Extended plugin options and hand to reverse engineer some things to make it work.  Mileage varies and those two posts may give you exactly what you need.

Anyway, on to the steps for setting up your custom Aweber newsletter form using a Studiopress theme.

There are 5 parts to this tutorial.

  1. Setting up a custom widget area for your newsletter signup box. (Only works with Genesis Framework).
  2. Writing your custom function for placing newsletters signup box after the post. (Only works with Genesis Framework)
  3. Specific Aweber elements and steps within your Aweber Admin area.
  4. Using Aweber newsletter html for your customer form via basic Text widget. (Works on any WordPress theme)
  5. Styling your newsletter signup box with css. (Works for any WordPress theme).

Steps 1, 2, and 5 are copied from Brian Gardner’s “How to Add an Email Newsletter Signup Box” blog post (linked above).

1. Register a Widget Area

Copy the code below and put it into your child theme’s functions.php file:

/** Register newsletter widget area */
genesis_register_sidebar( array(
    'id'    => 'newsletter',
    'name'    => __( 'Newsletter', 'custom-theme' ),
    'description'    => __( 'This is the newsletter section.', 'custom-theme' ),
) );

2. Write a Custom Function

Now you need to write a function which hooks the newsletter widget area to the end of the blog post. Copy the code below and put it into your child theme’s functions.php file:

/** Add the newsletter widget after the post content */
add_action( 'genesis_after_post_content', 'custom_add_newsletter_box' );
function custom_add_newsletter_box() {
    if ( is_singular( 'post' ) )
    genesis_widget_area( 'newsletter', array(
        'before' => '<div id="enews widget-area">',
    ) );
}

3. Aweber Specific Elements

In the graphic below, you’ll see key areas within your Aweber Admin so you have a point of reference.

Select (or Create) your Aweber List – If you don’t have a newsletter list created yet, you’ll need to make one. In the image, my newsletter list (used throughout this tutorial) is “yournewsletterlistname” as indicated by the “(A)” in the graphic.

Select (or Create) your Aweber Web Form – As indicated with the “(B)” and “(C)” areas, you’ll need to have a web form created for your newsletter list. By doing this, you’ll have a unique form ID which corresponds with your web form name. In the image, I’ve called this webform “WebFromName”. If you have to create a web form, all that matters is that your form has an email field since that’s all we require in this tutorial. In the image below, “(G)” shows “10101010107” as the web form ID. TIP: As you build or edit the form, you’ll see the unique form ID in your url and it will look like this: http://www.aweber.com/users/web_forms/edit/10101010107

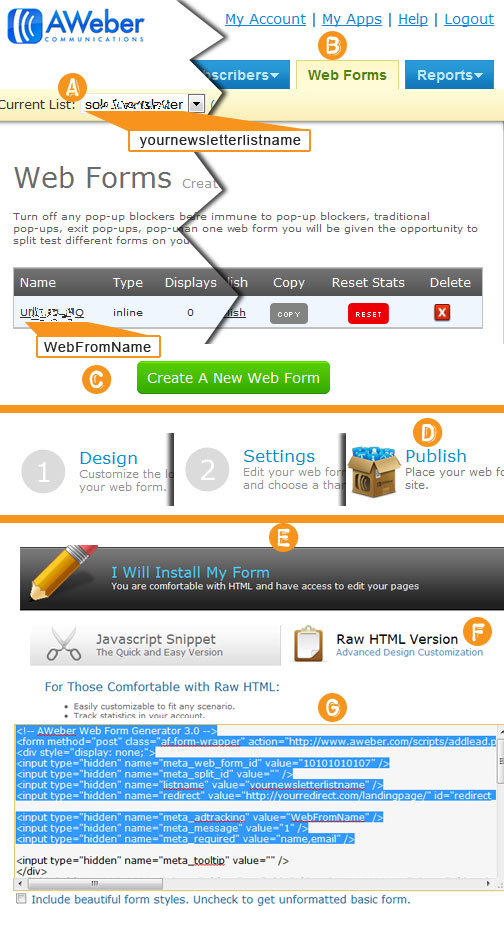
Areas D – G all happen within the web form tool of Aweber. Once your web form is published “(D)” you select the raw HTML “(F)” and use only a few parts of the provided HTML code shown in “(G)”.

Select your Aweber Web Form Code in Aweber Admin

Here is the chunk of code you want to pull out from Aweber and work with. NOTE, this is not exactly acceptable as is!

[prettify class=”html”]


[/prettify]

The code snippet above is just reference, so don’t use it yet! If you have your form submission redirecting to a certain page, you’ll want that full url and make sure to keep the id=”redirect_0ed…” with the url.

4. Your CSS styled Aweber Code to place in your Text Widget

Here is the HTML code you with CSS. You’ll place your version of this code using the right listname, webform id, redirect, ad tracking etc into a basic Text Widget in your Widgets area. Place this Text Widget inside the “Newsletter Widget” you created using steps #1 and #2 of this tutorial. NOTE, this code is still needs your unique Aweber elements but is otherwise ready to use as is!

[prettify class=”html”]

Your Newsletter Title

Your custom call to action text for readers to signup to your newsletter


[/prettify]

5. CSS for Newsletter Box

Download the graphics which are necessary and place them into your child theme’s /images/ directory. Then copy the code below and put it into your child theme’s style.css file:

[prettify class=”html”]/* eNews Extended Widget code modified from original source http://www.briangardner.com/email-newsletter-signup-box/
———————————————————— */
.enews {
background-color: #e7e7e7;
border: 9px solid #ddd;
margin: 0 10%;
}

.enews.widget-wrap {
border: 1px solid #fff;
}

.enews {
background: url(images/enews-ribbon.png) no-repeat top left;
margin: 17px 18px;
overflow: hidden;
padding: 45px 50px 40px;
text-align: center;
text-shadow: 1px 1px #fff;
}

.enews #subbox {
background: #fff no-repeat center left;
-moz-box-shadow: 0 0 3px #bbb;
-webkit-box-shadow: 0 0 3px #bbb;
box-shadow: 0 0 3px #bbb;
color: #999;
margin: 10px -7px 10px 0;
padding: 13px 0 13px 37px;
width: 80%;
}

.enews #subbutton {
background-color: #666;
color: #fff;
padding: 13px 12px;
}

.enews #subbutton:hover {
background-color: #555;
}[/prettify]

Hopefully that made sense and works for you. I also used this Aweber Post about the form html to wrap my mind around what was needed from Aweber code

I'M GIVING YOU MY BIGGEST GROWTH INSIGHTS FROM THE LAST 20 YEARS - FREE.

Get The 9 Secrets I’VE USED TO GENERATE MILLIONS OF DOLLARS, LAUNCH PRODUCTS, START COMPANIES AND EVEN TRANSFORM A BUSINESS AND HAVE IT ACQUIRED BY A FORTUNE 100 IN LESS THAN 20 MONTHS. Get The 9 Secrets
Justin McCullough

About Justin McCullough

Justin is a business builder, speaker and author. Over the last 15 years, he has delivered more than 500 critical projects ranging from launching businesses, websites, ecommerce sites, custom apps, newspapers, magazines, books, advertising campaigns, and strategic marketing initiatives. Co-workers, vendors, and clients work with Justin because he listens, clarifies the ambiguous, sets goals, inspires action, and delivers results. Justin is married, the father of two young boys, and Christian. He likes smart people like you!

Are you trying to figure out what to do next with your career?

Accomplish your best, most meaningful work.

Get the Ebook!
  • Blog
  • Business Insights
  • How To
  • Personal Development
  • Marketing
  • Inspirational
  • Leadership
  • Spiritual
  • Books
  • Passion and Purpose

Organizations I've Helped:

Contact Justin McCullough

Cell: 409-550-6681
Email: getmccjustin (at) gmail dotcom
On Twitter: @mccJustin
On Facebook
On LinkedIn
On Google Plus

Or Stay Up To Date With The RSS Feed

"Finally, brothers, whatever is true, whatever is honorable, whatever is just, whatever is pure, whatever is lovely, whatever is commendable, if there is any excellence, if there is anything worthy of praise, think about these things." - Philippians 4:8 ESV